Good Morning stamping friends. Oh the wedding was absolutely beautiful last night. I am so happy for Eliott and Reed. They make such a stunning couple. I am so mad because I left my camera at home so I have no pics. GRRRR! I changed purses at the last minute before we left and when I went to grab for it at the church it wasn't there. So now I am at everyone's mercy to get me pics. Today is a big tailgate party at the Iowa game but I am not going. I am going to bake the casseroles and the dump cake I will be taking to Kathy's tomorrow for the gift opening. That should be fun.
This card I stamped quick before I left for a dear friend of mine that gave me a care package to travel with with lots of healthy goodies in it. She is so sweet. I just love her. This is the Ex Libris stamp that is a big background stamp. I used Crumb Cake for my base and Naturals White and used Rich Razzleberry ink.
The greeting is from Curly Cute and I see I stamped it a bit crooked with Crumb Cake ink. Ha, story of my life. LOL! I punched out little flowers from the Itty Bitty Shapes Punch Pack and stuck them on with a Mini Glue Dot and then added the Basic Pearls. Very easy peasy card for you today. I have a lot of cooking to do today so better get to it. I want to watch the game too so have to get it done this morning.
I hope you have a blessed day and thanks for stopping by and I hope you have a great weekend.
Remember you can shop here www.funtostamp.stampinup.net 24/7 in your jams. I hope you get a chance to create something cute and if you have any questions please don't hesitate to ask. Hugs, Bev
Showing posts with label Curly Cute. Show all posts
Saturday, October 20, 2012
Tuesday, September 18, 2012
Stippled Blossoms thinking of you card
Well hello stamping friends, I am so sorry it has been a couple of days but wow have I been busy working and last night when I got home from my 30 hour stretch of work in 3 days I had to make my stewed tomatoes and got those done. Now I have a whole big bag of Tomatillos to make my Salsa Verde today. I really appreciated my Kuerig this morning as I am on my 3rd cup. I did start a loaf of bread in my bread baker this morning too. It is outright chilly in here but I refuse to turn my heat on till October. Ridiculous I know.
This is the first time I have stamped for days. It felt good to pump out this card this morning for a couple of card challenges. Also a very dear friend of mine Julia Sager and I are going to swap cards now each month and she had some samples of this Stipple Blossoms stamp set and I resisted for a long time about buying it even though I loved it. I saw her darling cards and decided I had to have it. Thanks Julia. LOL! She decided to start swapping with this set. It is a two step stamp set and I love how my card turned out. I hope she will like it too. When I get her's back I will post it. On my card my base is Old Olive, second layer so saffron that I wheeled the two builder wheels Travel Journal, Linked Lace with So Saffron Ink in the middle and then textured with the Lacy Brocade EF. I stamped the two step flowers in Rich Razzleberry and Perfect Plum onto Whisper White and stamped off on the first image and then full strength ink on the top layer. Then I punched them out with the one inch circle punch and punched them out with the 1-1/4" Scallop Circle Punch that I textured with the Perfect Polka Dots EF as I see dots in the flower and the Lacy Brocade. Then I added a little pearl in the middle of the flower. Popped them up with a dimensional and on the bottom I used the leaf that I fussy cut out and added it under my flower. I wrapped the Rich Razzleberry 3/8" Taffeta Ribbon(retired), around my card and snailed it down. I added a Round Ribbon Slide and took another piece of ribbon and slipped it through the slits and tied a knot. I added a banner with the Curly Cute Set and then used my Color Spritzer tool. I rounded my corners with the 1-3/4" Circle Punch. I hope my card will be okay for Retro Sketches as I added a banner.Yikes.
Here are the details:
Stamp Sets: Stippled Blossoms, Curly Cute, Travel Journal and Linked Lace Builder Wheels
Card Stock: Old Olive, So Saffron, Whisper White, Rich Razzleberry, Perfect Plum
Inks: Old Olive, So Saffron, Rich Razzleberry Ink Pad and Marker, Perfect Plum
Tools and Accessories: Big Shot, Lacy Brocade Textured Impressions Embossing Folder, Perfect Polka Dots Textured Impressions Embossing Folder, 1-1/4" Scallop Circle Punch, 1" Circle Punch, 1-3/4 Circle Punch, 3/8" Taffeta Ribbon, Round Designer Ribbon Slide, Color Spritzing Tool, Large Wheel Handle, Builder Wheel Spindle and Spacers, Dimensionals, Mini Glue Dots.
Okay I better get showered and dressed and start canning so I hope you like my card today and make sure you check out the other stampers at the links below. Hugs, Bev
http://retrosketches.blogspot.com/
http://colourq.blogspot.com/
Now I see they don't show this color challenge on the colourq blog yet so probably tomorrow or tonight they will and I will link it then. I follow one of the design team so I get the challenge early I guess.
Tuesday, July 24, 2012
Betsy's Blossoms Thinking Of You
Hi stamping friends, I hope your Tuesday is going great so far. I hope I can make it better with this darling card I made this morning. Most of you know I was blog creeping for any info from the Stampin' UP! convention that I could find. LOL! I found this technique. I call it Notched Circle Flower Technique but I got this idea off of Meg Davies who is such a sweetheart and you should check out her blog at iteachstamping.com . She has a video but I can tell you how to do it also. You take any size circle punches and take your Pennant Punch and stick the circle in the non ruffled pennant and punch a "V" into the edge of your circle like above.
Here I took the 2-1/2"circle and cut out the flower from the Betsy's Blossom then stamped 2 more flowers and punched one out using the 1-3/4" Circle punch and the other out of the middle of the flower using the 1-1/4" Circle Punch. I notched each one like the other and then curled them a bit with my bone folder and then snailed them together. I pierced a whole in the center of the top layer and put in a Designer Printed Brad in the middle. Then I used the 3" Circle Die to make the biggest circle and textured it with the Argyle EF. I used the Travel Journal Builder Wheel with my Basic Black ink and ran it through the middle of my card. The banners were made with Comfort Cafe DSP, and First Edition Specialty DSP and then the 3/8" Ruffled Ribbon. Let me know what you think of my card and this technique. Make sure you take a look at Meg's blog too if you don't understand.
Here are the details:
Stamp Set: Betsy's Blossoms, Curly Cute, Travel Journal Builder Wheel
Card Stock: Pool Party, Naturals White, Basic Black, Comfort Cafe DSP, First Edition Specialty DSP
Inks: Basic Black, Pool Party
Tools: Big Shot, Argyle Textured Impressions Embossing Folder, 3" Circle Die, 2-1/2" Circle Punch, 1-3/4" Circle Punch, 1-1/2" Circle Punch, In Color Designer Printed Brads, 3/8" Ruffled Ribbon, Dimensionals
Thanks so much for stopping by my blog and I feel so blessed to have you checking my cards out. I hope you have a honey of a night. Hugs, Bev
Shop for your stamping needs here: www.funtostamp.stampinup.net
Thursday, June 21, 2012
Baby Prints Baby Boy card from Stampin' UP!
Baby Baby Baby. Everywhere there are babies being born in this little town in the last couple of weeks. This was a real quick card I made a few weeks ago so I figured I would show it now. This was about a 3 minute card and that is no lie. I had to make that twins baby card I posted and called the gal that wanted it and she said she needed the boy card too. So I quick whipped this card up for her as she was on her way over. Cut card stock, stamp, texture 2nd layer, cut out with die, sponge add pearls and make the tag the same way and use the square punch for the end of the tag instead of fussy cutting them. Wa la my card is done.
I am so tired from work today. It was unload the hardware truck and lift 50 pound and 80 pound stuff. Uffda I am tired. I am glad the NBA game is on tonight and I can relax and watch it. I will be posting something tomorrow night when I get home from work and then I am working Saturday too. I will be tired for sure. I hope your week is going well. I haven't heard how my friend Cindy is doing but thanks for all your prayers. I know prayers help.
Here are the details:
Stamp Sets: Baby Prints, Curly Cute
Card Stock; Bashful Blue, Whisper White
Inks: Bashful Blue
Tools: Big Shot, Fancy Fan Textured Impressions Embossing Folder, Apothecary Accents Framelits, 1-1/4" Square Punch, Basic Pearls, Sponge, Dimensionals.
Thanks for stopping by today and I hope you have a great Friday. Thanks for all the kind comments and I try to thank all of you personally so I hope I don't leave anyone out. I certainly don't mean too.
God bless, Bev
Tuesday, May 29, 2012
Happy Birthday Card
Hello friends, how was your weekend? Great I hope. Mine was nice. I got a call from a dear friend of mine too so that was so nice to talk with her. She has been stamping a lot too. It sure was too cold for my comfort though and I hope it warms up soon. I did a bit of stamping, cooking, and cleaning. I did get to town so I could finish my egg salad this morning. The thermometer said 40 when I looked at it. Brrr, still cold and they are saying we might get frost too. Jeepers, come on it is almost June! I will have to cover my garden. I slept in this morning so I am behind a bit in my day. It sure felt good however. I worked on my newsletter a bit and still don't have to go to work till Thursday. Yay! Then I can start getting ready for my Stamp Your Heart Out that I am having on Friday. Come on over if you are in the area, you pay me $15 to use all my stuff. Place an order and you get a discount and bring a friend and you will also get a discount too. I hope to see you at my door.
I came up with this card that I thought turned out really cute. I used the White Craft Ink to stamp the trio flower stamp in Betsy's Blossoms which is a darling set in the upcoming catalog. Then I used the Postage Stamp Punch to punch the edge of the Basic Gray and the Twitterpated DSP and then stamped the big flower from the set with Riding Hood Red ink and punched it out with the 2-1/2 " Circle Punch and used Dimensionals to pop it up and stuck a Rhinestone in the center of it for some "BLING". I used my heat tool to dry the Craft Ink and then stamped the Happy Birthday with the Curly Cute word set.
Here are the details:
Stamp Sets: Betsy's Blossoms, Curly Cute
Card Stock: Old Olive, Basic Gray, Whisper White, Twitterpated DSP (which will be carried over to the catalog.)
Inks: White Craft Ink, Riding Hood Red
Accessories: Postage Stamp Pinch, Basic Gray 3/8" Taffeta Ribbon, Basic Rhinestones, Dimensionals.
Thanks for stopping on by to view my blog and please leave me a comment so I know who you are and invite your friends to visit too. Now go and create something cute. Have a great day. Hugs, Bev
Thursday, April 12, 2012
Male Thinking of You Card
Hello stamping friends. Today I wanted to show you a card I made for a guy that I went to visit yesterday in the hospital. He is 88 and has a brain tumor and was sleeping when I got there so I don't even think he knew I was there. I tried to shake his arm but I am sure he is so heavily medicated that he was out. Then I remembered I had promised to make some cards for soldiers so I stamped a few of the same cards so I could give some to the Operation Write Home team that takes cards for soldiers. I asked my down line to stamp 5 to 10 cards also and follow the OWH guidelines. I once again was using up Designer Series Paper that I have to use before it is discontinued and this is the Well Worn DSP this time. I made several different cards out of it! How do you think this card turned out? I really like it.
Here are the details:
Stamp Sets: Distressed Dots, Curly Cute
Card stock: Crumb Cake, Cajun Craze, Not Quite Navy, Well Worn DSP
Inks: Crumb Cake, Cajun Craze, Not Quite Navy
Accessories: Big Shot, 3-1/2" Circle Die, 3" Circle Die, Square Lattice Textured Impressions Embossing Folder, Regals Brads, Sponge, Paper Piercing Tool and Mat Pack, Dimensionals.
Thank you for stopping by today and if you want to order any of these products you see click on my shop now button. Or have any questions on how I make my card drop me an email. Now remember to create something cute. Hugs, Bev
Wednesday, April 11, 2012
Happy Birthday Card with Image Overlay
Good morning stamping friends, it is a nice sunny day but I saw frost on my car this morning. BRRR! it must be cold. I am going to go to a hospital up north today to visit a local resident that is 88 and in the hospital with a brain tumor. He is a real nice man and I thought maybe I could cheer him up a little. That is on my plate today.
We had a fun and relaxing meeting last night. Eat Drink and Stamp, ain't life grand? LOL! I have such a great group of gals in my down line, I am really happy with them. Do you wanna join too? We have a lot of fun.
This was the card we made last night and I cased the idea from Tami White but made my card a whole lot different. You put the Beautiful Butterflies Die through the Big Shot with a window sheet to make a mask. Then lay it down on your card stock and with a sponge dauber that is inked up you burnish the color onto the card stock inside the window sheet mask. Then you take any design and with black ink you stamp the image over the burnished color inside the mask and this is what it looks like. OOOHHHH isn't is just boootiful? Okay do I hear clapping? I thought so. LOL! I did this technique two times stamping one on my card and the other one I cut out. I wrapped the bakers twine around it and put dimensions inside towards the body part of the butterfly so it would give it more dimension. I made the antennas by rolling a mini glue dot and then pressing the bakers twine against it. I use mini glue dots also to attach the Lace Ribbon Border Punch so you can't see all the snail. I am going to make this card at my party on the 21st. I know my customers will like it.
Here are the details:
Stamps Sets: Curly Cute and Just Believe
Card Stock: Pacific Point, Confetti White
Inks: Pacific Point, Daffodil Delight, Basic Black
Accessories: Big Shot, Beautiful Butterflies Die, Window Sheets, Island Indigo Baker's Twine, Lace Ribbon Border Punch, Sponge, Dimensionals, Mini Glue Dots
There are not many accessories on this WOW card! I hope you like this technique and I don't know the technical name for it but I called it Image Overlay because that is what you do. Let me know what you think. Don't you think we created something cute? I hope you will too. Happy stamping and scrapping and have a blessed day.
Hugs,Bev
Saturday, April 7, 2012
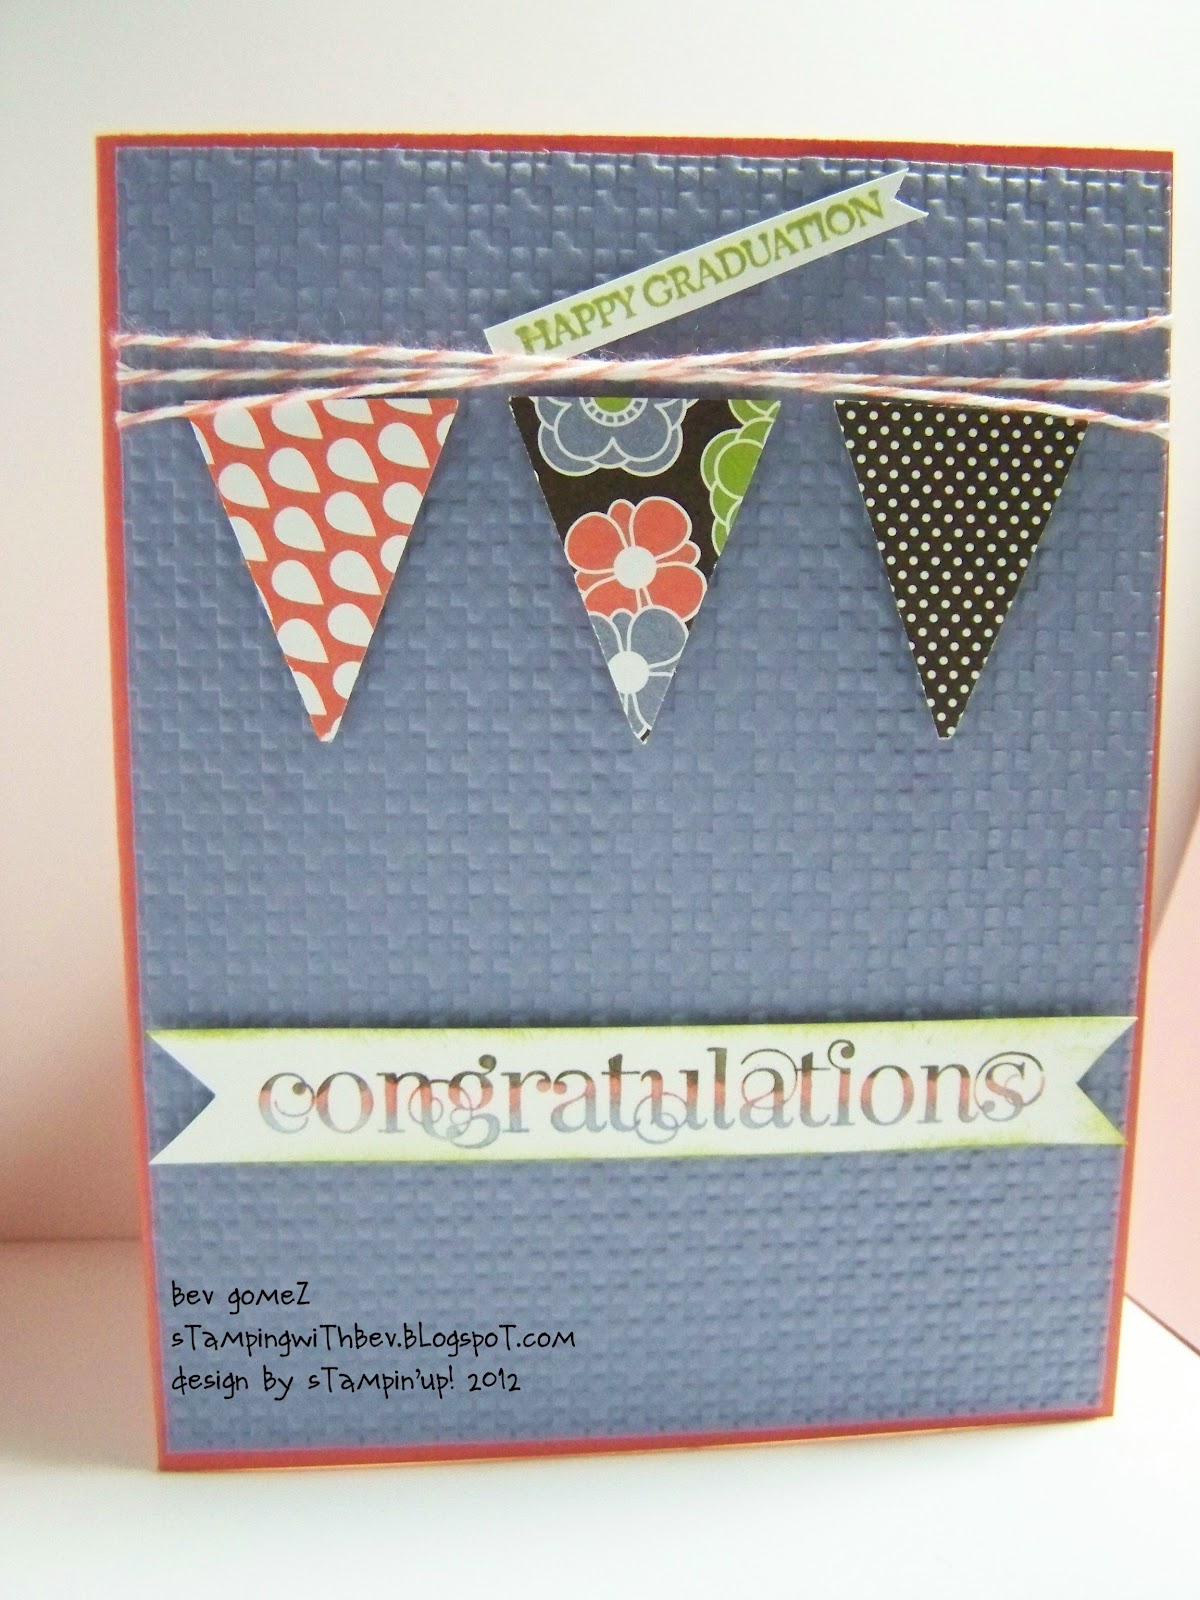
Happy Graduation Card Sunday Stamping Technique
Hello and Happy Easter Friends,
Today I want to show you this card that is really an easy card and showing you how to make a colorful tag. Stampin' Up! used to have these stamp pads called Kaleidacolor which had about 5 or 6 colors in them. Well, they really never matched exactly so thankfully they are gone now. On my Congratulations tag I took my Calypso Coral Marker and with the brush tip colored down the middle of the stamp, then took the Wisteria Wonder Marker and colored the bottom meeting up with the coral color and then the Early Espresso Marker doing the top working the same way. It just makes it so pretty. I did the lightest color first so my marker wouldn't get mucked up. Then I gave it the "breath of life" to moisten the ink by huffing on it. Isn't it pretty? I think so and it matches my card so well picking up all the colors in the DSP. I need some graduation cards and some of these are college gals so I am not concerned about colors. Yes, this was a very easy peasy card. And yes this is another card using the Berry Blossoms DSP. LOL! I have about 2 or 3 more cards to show you using that DSP. I absolutely love these prints in that pack! I am trying to use the DSP I have that is going to be discontinued so don't get it sick of it. LOL!
Here are the details:
Stamp Sets: Curly Cute, Teeny Tiny Wishes
Card Stock: Calypso Coral, Wisteria Wonder, Whisper White
Inks: Calypso Coral Marker, Wisteria Wonder Marker, Early Espresso Marker, Lucky Limeade Ink Pad
Accessories: Big Shot, Square Lattice Textured Impressions Embossing Folder, Petite Pennants Builder Punch, Calypso Coral Baker's Twine, Dimensionals
That's my technique for today and I hope you have a blessed Easter today and don't eat all the jelly beans. Thank you so much for stopping by and remember to create something cute. Hugs, Bev
Subscribe to:
Posts (Atom)